How to Build AI Agents with OpenAI in Node.js 2025 Tutorial
Building AI Agents with OpenAI in Node.js (2025)
In 2025, AI agents are transforming how software (opens in new tab) interacts with users and automates workflows. In this guide you’ll learn how to build AI agents with the OpenAI Node.js SDK, using Node.js and modern frameworks to create systems that reason, plan and act.
Node.js is great for AI development - it’s fast, flexible, and easy to integrate. With OpenAI’s latest SDKs, you can quickly build AI agents that think, act, and connect to real-world tools for automation.
By the end of this guide, you’ll know how to:
- Set up a Node.js project with OpenAI integration
- Implement function-calling AI agents that are able to follow multiple steps
- Use persistent memory features with the Assistants API for ongoing tasks
- Build resilient, optimized AI agents ready for production
Whether you’re a developer or AI enthusiast, this guide step-by-step shows how to build AI agents using OpenAI APIs.
Model Landscape in Late 2025
This guide uses GPT-4.1 and GPT-4.1-mini, which remain widely adopted, stable, and cost-effective models in late 2025, known for their strong reasoning and multitasking abilities, including multimodal inputs. While OpenAI released GPT-5 earlier this year, featuring more advanced capabilities, GPT-4.1 variants continue to provide excellent performance and affordability for many AI agent applications. For the latest updates on available models, please consult OpenAI’s official model documentation (opens in new tab).
Why Build AI Agents in 2025?
Picture a digital teammate that never sleeps, remembers everything and scales with your business. That’s exactly what happens when you develop OpenAI agents in Node.js (opens in new tab) - your applications don't just process data, they reason, plan, and act autonomously.
This isn't science fiction. Companies are automating research, handling customer requests, and streamlining operations in hours instead of weeks. Most developers can build their first working AI agent in Node.js in just a few hours - function calling and API integration included.
What Makes 2025 Different?
The OpenAI ecosystem has reached a new level:
- Models like GPT-4.1 and GPT-4.1-mini give higher performance and lower cost
- Structured output means valid JSON every time
- Function-calling allows parallel tool use
- Streaming responses provide real-time user feedback
- Vision features let AI agents handle images and text together
What you'll build in this tutorial:
- A working AI agent that searches the web, processes data, and makes decisions
- True Node.js + OpenAI integration, not just mock examples
- A production-ready setup with error handling and cost optimization for your Node.js / OpenAI agents.
By the end, you’ll know how to connect the dots - from handling user requests to letting AI agents act on their own.
This tutorial will show you how to build AI agents step by step, from setup to production-ready automation.
You'll see where things break (and how to fix them).
Ready to build software that thinks for itself?
Let’s roll up our sleeves and start building your first OpenAI-powered AI agent in Node.js.
What You Need to Build AI Agents in Node.js
Essential Knowledge and Skills
To follow this guide, you should be comfortable with:
- JavaScript basics - variables, functions, objects
- Async/await and Promises - handling asynchronous code
- ES modules (
import/export) - Basic error handling with
try/catch - Node.js fundamentals - installing packages (
npm), running scripts, and using environment variables
If you’ve ever built a simple Express server or connected to an API, you’re ready. If you’ve built a basic Node.js project before, you’re ready for this. It’s easier than it looks.
Tools & Setup
Here’s what you’ll need to set up your development environment:
- Node.js 20+ - ideal for the latest OpenAI Node.js SDK
- An OpenAI account and API key - required for building and testing AI agents
- Optional: A Search API key (Serper, Brave, or Tavily) for real web data access
- A modern code editor - we recommend VS Code for best Node.js support
Quick setup checklist:
- Node.js 20+ installed (
node -v) - OpenAI API key ready in
.env - (Optional) Serper API key for web search
- Code editor installed and terminal access
Estimated setup time: 10–15 minutes if you’re starting fresh.
Part 1: Node.js Project Setup and OpenAI Connection
By the end of this section, you'll have a working Node.js project connected to OpenAI's API, understand how to secure credentials properly, and verify everything works.
Step 1: Initialize Your Node.js Project
Open your terminal and create a new project directory:
bash
mkdir openai-agent-2025cd openai-agent-2025npm init -y
You just created a folder and a package.json file. Think of package.json as your project's blueprint, it tracks dependencies and configuration.
Enable ES6 modules: Edit your package.json and add this line:
json
{ "name": "openai-agent-2025", "version": "1.0.0", "type": "module", "main": "index.js", "scripts": { "start": "node index.js", "dev": "node --watch index.js" }}
The "type": "module" line enables modern import syntax instead of require().
Step 2: Install Required Dependencies
Install the OpenAI SDK and environment variable handler:
bash
npm install openai dotenv
What these packages do:
- openai (v4.x) - Official OpenAI SDK with full TypeScript support
- dotenv - Loads environment variables from
.envfiles
For development, also install:
bash
npm install --save-dev jest @types/node
Step 3: Secure Your API Keys
Create a .env file in your project root:
env
OPENAI_API_KEY=sk-proj-your-actual-key-hereSERPER_API_KEY=your-serper-key-here
Critical security step: Add .env to .gitignore:
bash
echo ".env" >> .gitignoreecho "node_modules/" >> .gitignore
Why environment variables? Imagine leaving your house key under the doormat - terrible idea! API keys belong in .env files, never hardcoded in your source code. This is industry standard security practice.
⚠️ Security note: Never share your `.env` file - it contains sensitive API keys. Treat it like a password and make sure it’s listed in your `.gitignore`.
What happens if you skip this? Your API keys could end up on GitHub, get scraped by bots, and rack up thousands in unauthorized charges within hours.
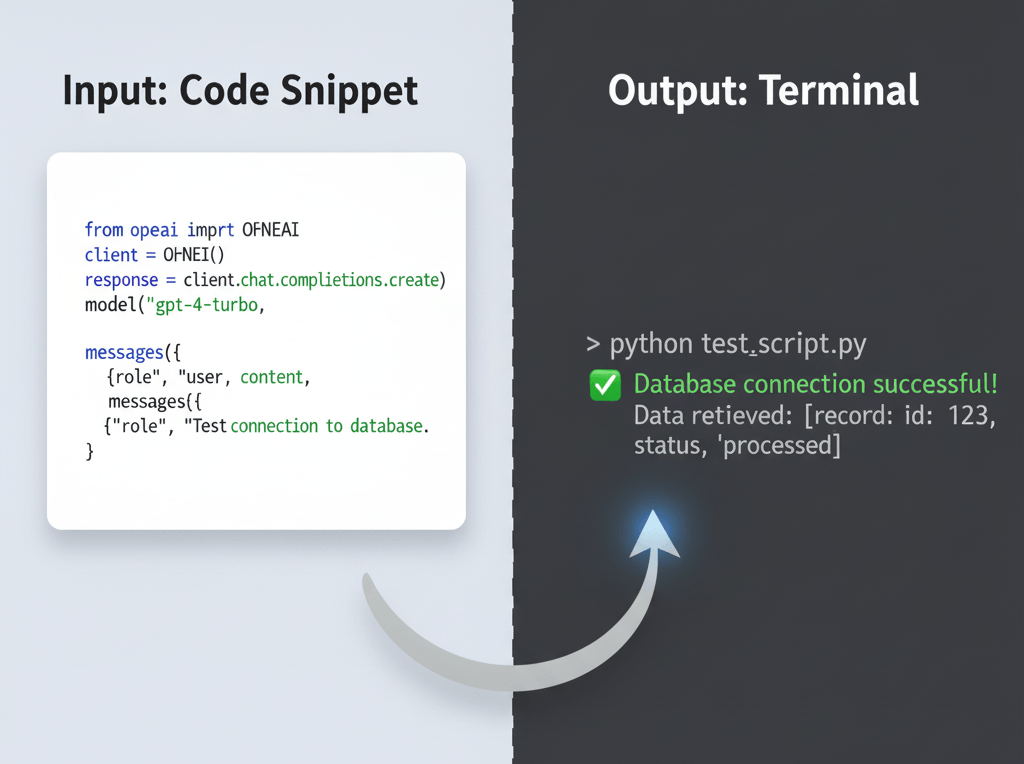
Step 4: Test Your OpenAI Connection
Create index.js with a simple connection test:
javascript
import 'dotenv/config';import OpenAI from 'openai';const openai = new OpenAI({ apiKey: process.env.OPENAI_API_KEY });async function testConnection() { try { console.log('Testing OpenAI connection...');
const response = await openai.chat.completions.create({ model: "gpt-4.1-mini", // Current mainstream, cost-effective model in late 2025. Consider GPT-5 for cutting-edge features. messages: [ { role: "user", content: "Say hi and confirm you're working!" } ], max_tokens: 50 // Limit tokens to control costs });
console.log('✅ Connection successful!'); console.log('Response:', response.choices[0].message.content); console.log('Tokens used:', response.usage.total_tokens);
} catch (error) { console.error('❌ Connection failed:'); console.error('Error:', error.message);
if (error.status === 401) { console.error('Check your API key in .env file'); } else if (error.status === 429) { console.error('Rate limit exceeded or insufficient credits'); } }}testConnection();
Run your test:
bash
npm start
Expected output:
Testing OpenAI connection...
✅ Connection successful!
Response: Hi! I'm working perfectly and ready to help you.Tokens used: 23
💡 Pro tip: Always test your API connection before moving to function-calling agents.
⚠️ Security note: Never share your .env file - it contains sensitive API keys.
Troubleshooting common errors:
Error | Cause | Fix |
|---|---|---|
| Missing .env file or wrong key name | Verify .env exists and has correct key name |
| Invalid API key | Re-copy key from OpenAI dashboard |
| Out of credits or rate limited | Add credits or wait a few minutes |
| Dependencies not installed | Run |
Step 5: Understanding the Response Object
Let's examine what OpenAI returns:
javascript
{ id: 'chatcmpl-abc123', object: 'chat.completion', created: 1699999999, model: 'gpt-4.1-mini', choices: [ { index: 0, message: { role: 'assistant', content: 'Hi! I'm working perfectly...' }, finish_reason: 'stop' } ], usage: { prompt_tokens: 15, completion_tokens: 8, total_tokens: 23 }}
Key fields explained:
- choices[0].message.content - The AI's response text
- usage.total_tokens - How many tokens were used (affects cost)
- finish_reason - Why response ended ('stop' = complete, 'length' = hit max_tokens)
Cost calculation: With gpt-4.1-mini at $0.15 per 1M input tokens and $0.60 per 1M output tokens, this test cost approximately $0.000007 (less than a penny).
💡 Pro tip: Always check usage.total_tokens - it helps you track costs and optimize performance early.
What's Next?
At this point, your Node.js project is properly configured and talking to OpenAI's API. You've verified authentication works and understand the basic request/response pattern.
In Part 2, we'll build a real agent that can use tools, starting with web search capabilities using actual API integrations.
AI Agents vs Chatbots - What’s the Difference?
Before diving into code, let's clarify what makes an AI agent different from a basic chatbot. This distinction is crucial for knowing when to use which approach.
Simple Chatbot (Chat Completions API)
What it does: Gives direct responses, like texting someone who replies instantly.
Example interaction:
You: "What's the weather in Vilnius?"
Bot: "I don't have access to real-time weather data, but typically Vilnius in November averages 3-5°C..."
Characteristics:
- ❌ No memory between conversations
- ❌ Cannot access external data
- ❌ Single-turn request/response
- ✅ Fast and cheap
- ✅ Perfect for simple Q&A
When to use chat completions:
- FAQ bots with scripted responses
- Content generation (write blog post, draft email)
- Text analysis (summarize, translate, extract data)
- Code assistance (explain, debug, suggest)
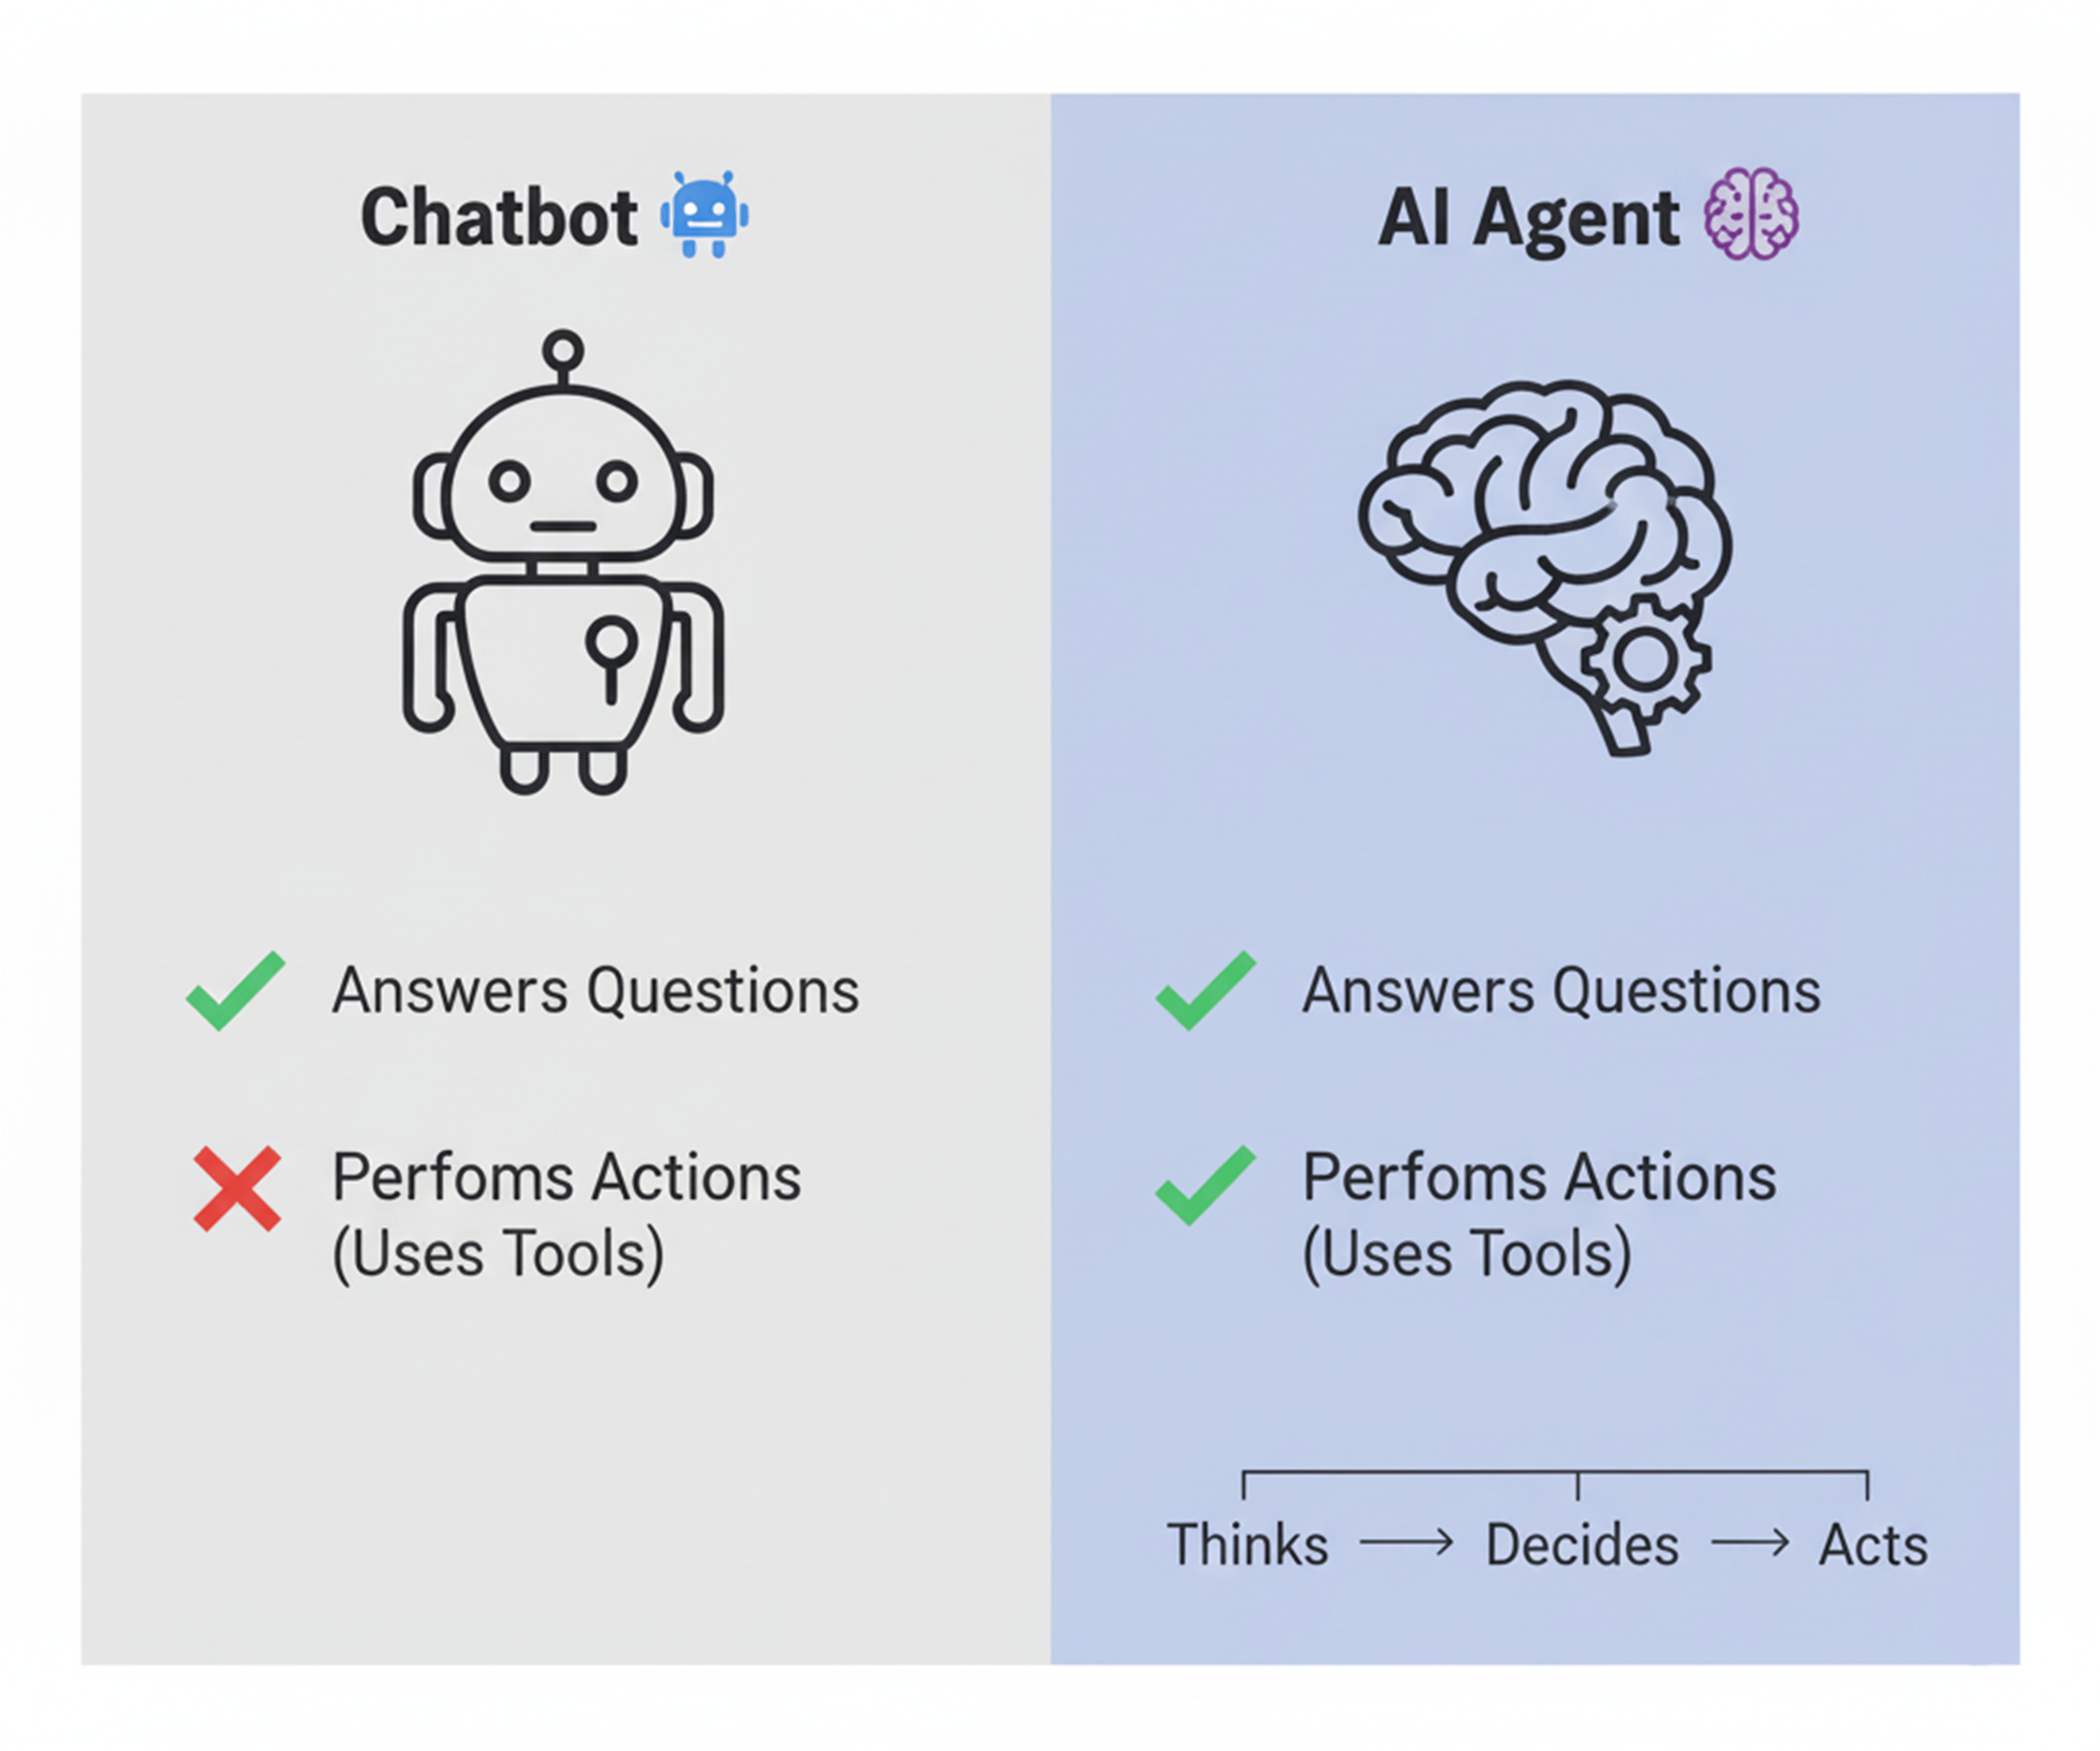
AI Agent (Function Calling + Tools)
What it does: Plans, acts, and uses tools autonomously to accomplish goals.
Example interaction:
You: "What's the weather in Vilnius?"
Agent: [Thinks: I need current weather data]
[Action: Calls weather API with coordinates]
[Processes: Receives forecast data]
[Responds: "Currently 4°C in Vilnius with light rain. Tomorrow: 6°C, partly cloudy."]
Characteristics:
- ✅ Can use external tools (APIs, databases, search)
- ✅ Multi-step reasoning and planning
- ✅ Makes decisions based on tool results
- ✅ Handles complex workflows
- ⚠️ More expensive per interaction
- ⚠️ Requires careful error handling
When to use AI agents:
- Research tasks requiring multiple sources
- Business automation (invoice processing, data analysis)
- Customer service with CRM integration
- Any task requiring real-time information
The OpenAI Assistants API (Advanced Agents)
What it adds: Persistent memory, built-in tools, and thread management.
Example use case:
Monday: "Analyze this sales spreadsheet" [uploads file]
Tuesday: "Compare it to last week's data" [agent remembers previous file]Wednesday: "What's the trend?" [agent recalls entire conversation history]
Characteristics:
- ✅ Remembers context across sessions
- ✅ Built-in tools (code interpreter, file search)
- ✅ Manages conversation threads automatically
- ✅ Perfect for ongoing tasks
- ⚠️ Higher cost due to storage and processing
- ⚠️ More complex setup
When to use Assistants API:
- Multi-session workflows (customer support)
- Document analysis over time
- Personal assistants that learn preferences
- Complex projects requiring memory
Quick Decision Guide
Your Need | Use This |
|---|---|
Simple Q&A, no memory needed | Chat Completions |
Need real-time data or tools | Function Calling (Agent) |
Need memory across sessions | Assistants API |
Cost is primary concern | Chat Completions |
Building complex automation | Assistants API |
In this tutorial, we'll build both:
- Part 2: Function calling agent (web search capability)
- Part 3: Assistants API (persistent memory and threads)
This gives you the complete toolkit for any AI automation project.
Part 2: Building a Function-Calling Agent with Web Search
By the end of this section, you'll have a working AI agent that can search the web, process results, and answer questions with current information. No mocks - real API integration.
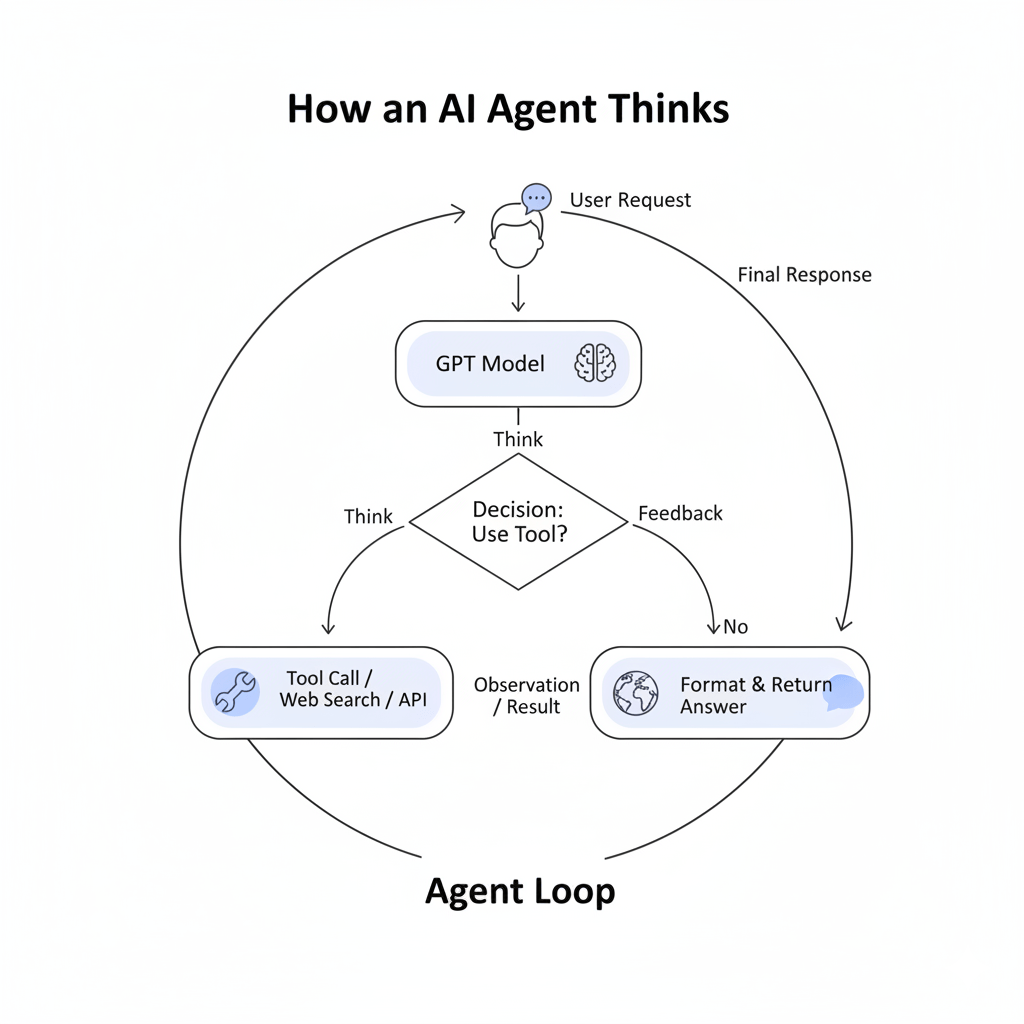
Understanding the Agent Loop
Before writing code, let's understand how (opens in new tab) agents think.
Imagine a chef preparing a meal:
- You order spaghetti
- Chef checks available ingredients (tools)
- Realizes they need fresh tomatoes (tool call needed)
- Sends assistant to get tomatoes (executes tool)
- Receives tomatoes (tool result)
- Finishes cooking (final response)
This is the agent loop:
User Request → Agent Thinks → Needs Tool?
↓ Yes ↓ No
Execute Tool Return Answer
↓Get Result → Agent Thinks → Loop continues
Key insight: The agent doesn't execute linearly. It loops, deciding at each step whether it has enough information or needs more tools.
Agent Types in 2025
1. Reactive Agents
- Process each request independently
- No memory or learning
- Example: Basic FAQ bot
2. Planning Agents
- Break goals into steps before acting
- Create execution plans
- Example: Trip planning assistant
3. Tool-Using Agents (What we're building)
- Call external functions/APIs
- Integrate with real-world systems
- Example: Research agent with web search
4. Hybrid Agents
- Combine multiple strategies
- Most production systems use this
- Example: Customer service with memory + tools
Step 1: Define Your Agent's Tools
Tools are functions your AI can call to accomplish tasks it can't do alone, like searching the web or querying databases.
Create tools.js:
javascript
// tools.jsexport const tools = [ { type: "function", function: { name: "search_web", description: "Search the web for current information. Use this when you need up-to-date data, news, or facts that happened after your knowledge cutoff.", parameters: { type: "object", properties: { query: { type: "string", description: "The search query. Be specific and include relevant keywords." }, num_results: { type: "number", description: "Number of results to return (1-10)", default: 3 } }, required: ["query"] } } }, { type: "function", function: { name: "calculate", description: "Perform mathematical calculations. Use for any arithmetic or math operations.", parameters: { type: "object", properties: { expression: { type: "string", description: "Mathematical expression to evaluate (e.g., '2 + 2' or '15 * 23')" } }, required: ["expression"] } } }];
Why structure tools this way? The AI needs clear descriptions to decide when to use each tool. Good descriptions = better tool selection.
Bad description example:
javascript
description: "Search stuff" // Too vague
Good description example:
javascript
description: "Search the web for current information. Use this when you need up-to-date data, news, or facts that happened after your knowledge cutoff."
Step 2: Implement Tool Execution (Real APIs)
Now we'll create actual working implementations - no mocks.
Create tool-executor.js:
javascript
// tool-executor.jsimport 'dotenv/config';
/**
* Executes web search using Serper API (Google results) */async function searchWeb(query, numResults = 3) { try { const response = await fetch('https://google.serper.dev/search', { method: 'POST', headers: { 'X-API-KEY': process.env.SERPER_API_KEY, 'Content-Type': 'application/json' }, body: JSON.stringify({ q: query, num: numResults }) }); if (!response.ok) { throw new Error(`Serper API error: ${response.status}`); } const data = await response.json();
// Extract and format results const results = data.organic?.slice(0, numResults).map(item => ({ title: item.title, snippet: item.snippet, link: item.link })) || []; return { query, results, searchTime: new Date().toISOString() };
} catch (error) { console.error('Search error:', error.message); return { error: `Failed to search: ${error.message}`,
query }; }}
/**
* Safely evaluates mathematical expressions */function calculate(expression) { try { // Basic safety: only allow numbers and operators if (!/^[\d\s+\-*/().]+$/.test(expression)) { throw new Error('Invalid expression: only numbers and basic operators allowed'); }
// Using Function constructor as a safer alternative to eval const result = new Function(`return ${expression}`)();
return { expression, result, calculated: true };
} catch (error) { return { expression, error: `Calculation failed: ${error.message}`, calculated: false }; }}
/**
* Routes tool calls to their implementations */export async function executeFunction(functionName, functionArgs) { console.log(`🔧 Executing tool: ${functionName}`); console.log(`📝 Arguments:`, functionArgs);
switch (functionName) { case 'search_web': return await searchWeb( functionArgs.query, functionArgs.num_results );
case 'calculate': return calculate(functionArgs.expression);
default: throw new Error(`Unknown function: ${functionName}`); }}
What's happening here?
- searchWeb() - Calls Serper API (real Google search results)
- calculate() - Safely evaluates math expressions
- executeFunction() - Routes tool calls to correct implementation
Security note: The calculate() function validates input to prevent code injection. Never use eval() directly with user input!
Step 3: Build the Complete Agent Loop
Now let's tie everything together with the agent's decision-making logic.
Create agent.js:
javascript
// agent.jsimport 'dotenv/config';import OpenAI from 'openai';import { tools } from './tools.js';import { executeFunction } from './tool-executor.js';const openai = new OpenAI({ apiKey: process.env.OPENAI_API_KEY });
/**
* Agent loop - keeps running until task is complete */export async function runAgent(userMessage, options = {}) { const { model = 'gpt-4.1-mini', // Cost-effective for most tasks maxIterations = 5, // Prevent infinite loops verbose = true // Log agent thinking } = options; const messages = [ { role: 'system', content: 'You are a helpful AI assistant with access to web search and calculation tools. Use tools when you need current information or need to perform calculations. Always provide clear, accurate answers.' }, { role: 'user', content: userMessage } ]; let iterationCount = 0; while (iterationCount < maxIterations) { iterationCount++;
if (verbose) { console.log(`\n🤔 Agent thinking (iteration ${iterationCount})...`); } try { // Call OpenAI with tools available const response = await openai.chat.completions.create({ model, messages, tools, tool_choice: 'auto', // Let AI decide when to use tools }); const message = response.choices[0].message; messages.push(message); // Log token usage for cost tracking if (verbose) { console.log(`💰 Tokens used: ${response.usage.total_tokens}`); } // If no tool calls, we have final answer if (!message.tool_calls || message.tool_calls.length === 0) { if (verbose) { console.log('✅ Agent finished thinking\n'); } return { answer: message.content, iterations: iterationCount, tokensUsed: response.usage.total_tokens }; } // Execute each tool call if (verbose) { console.log(`🔧 Agent needs to use ${message.tool_calls.length} tool(s)`); } for (const toolCall of message.tool_calls) { const functionName = toolCall.function.name; const functionArgs = JSON.parse(toolCall.function.arguments); // Execute the tool const result = await executeFunction(functionName, functionArgs); if (verbose) { console.log(`✓ Tool result:`, JSON.stringify(result, null, 2)); } // Add tool result back to conversation messages.push({ role: 'tool', tool_call_id: toolCall.id, content: JSON.stringify(result) }); } // Loop continues - agent will think about tool results } catch (error) { console.error('❌ Agent error:', error.message); throw error; } } // Hit max iterations without finishing throw new Error(`Agent exceeded maximum iterations (${maxIterations})`);}
What's the agent doing?
- Sends user message to GPT-4.1 with tools available
- AI decides: "Do I need to use a tool?"
- No tools needed → Returns final answer
- Tools needed → Requests tool execution
- Executes tools and adds results to conversation
- Loops back to step 1 with new information
- Repeats until it has enough info for final answer
Safety features:
maxIterationsprevents infinite loops (costs money!)verboselogging helps debug what agent is thinking- Token usage tracking monitors costs in real-time
Step 4: Test Your Agent
Update index.js to test the agent:
javascript
// index.jsimport { runAgent } from './agent.js';async function main() { console.log('🚀 Starting OpenAI Agent Demo\n'); console.log('=' .repeat(50)); // Test 1: Simple question (no tools needed) console.log('\n📝 Test 1: Simple question'); console.log('Question: "What is 15 multiplied by 23?"');
const result1 = await runAgent('What is 15 multiplied by 23?'); console.log('\n💬 Answer:', result1.answer); console.log('📊 Stats:', `${result1.iterations} iterations, ${result1.tokensUsed} tokens`); // Test 2: Requires web search console.log('\n' + '='.repeat(50)); console.log('\n📝 Test 2: Current information'); console.log('Question: "What are the latest developments in AI agents?"');
const result2 = await runAgent( 'What are the latest developments in AI agents?', { verbose: true } ); console.log('\n💬 Answer:', result2.answer); console.log('📊 Stats:', `${result2.iterations} iterations, ${result2.tokensUsed} tokens`); // Test 3: Multi-step reasoning console.log('\n' + '='.repeat(50)); console.log('\n📝 Test 3: Complex task'); console.log('Question: "Search for Node.js best practices and calculate 100 * 12"');
const result3 = await runAgent( 'Search for Node.js best practices and calculate 100 * 12' ); console.log('\n💬 Answer:', result3.answer); console.log('📊 Stats:', `${result3.iterations} iterations, ${result3.tokensUsed} tokens`);}main().catch(console.error);
Run your agent:
bash
npm start
Expected output:
🚀 Starting OpenAI Agent Demo
==================================================
📝 Test 1: Simple question
Question: "What is 15 multiplied by 23?"
🤔 Agent thinking (iteration 1)...
🔧 Agent needs to use 1 tool(s)
🔧 Executing tool: calculate
📝 Arguments: { expression: '15 * 23' }
✓ Tool result: {
"expression": "15 * 23",
"result": 345,
"calculated": true
}
💰 Tokens used: 156
🤔 Agent thinking (iteration 2)...
💰 Tokens used: 187
✅ Agent finished thinking
💬 Answer: 15 multiplied by 23 equals 345.📊 Stats: 2 iterations, 187 tokens
Congratulations!
You've built a working AI agent that:
- ✅ Makes autonomous decisions about tool usage
- ✅ Searches the web with real API integration
- ✅ Performs calculations safely
- ✅ Handles multi-step reasoning
- ✅ Tracks costs and iterations
What you learned:
- Agent loop patterns (think → act → repeat)
- Real API integration (not mocks)
- Tool execution and result handling
- Cost tracking and safety limits
Next in Part 3: We'll upgrade to the Assistants API for persistent memory across sessions, turning your agent into a long-term digital teammate.
Part 3: Add Persistent Memory with the OpenAI Assistants API
Ready to level up? In this section, you'll build an advanced AI assistant that remembers conversations, manages multi-session workflows, and handles complex tasks over time.
Why Use the Assistants API?
The function-calling agent from Part 2 has a limitation: No memory between runs. Every conversation starts fresh.
Real-world problem:
Monday 9 AM:
You: "Analyze this sales spreadsheet" [uploads file]
Agent: [Analyzes] "Revenue increased 15% in Q4..."
Tuesday 10 AM:
You: "What was that revenue number again?"Agent: "I don't have access to any spreadsheet."
The agent forgot! This makes it unsuitable for:
- Customer support (needs conversation history)
- Document analysis over time
- Personal assistants that learn preferences
- Multi-day projects
The Assistants API solves this with:
- Persistent threads - Conversations stored long-term
- Built-in tools - Code interpreter, file search included
- Automatic memory - Context maintained across sessions
- Stateful workflows - Pick up where you left off
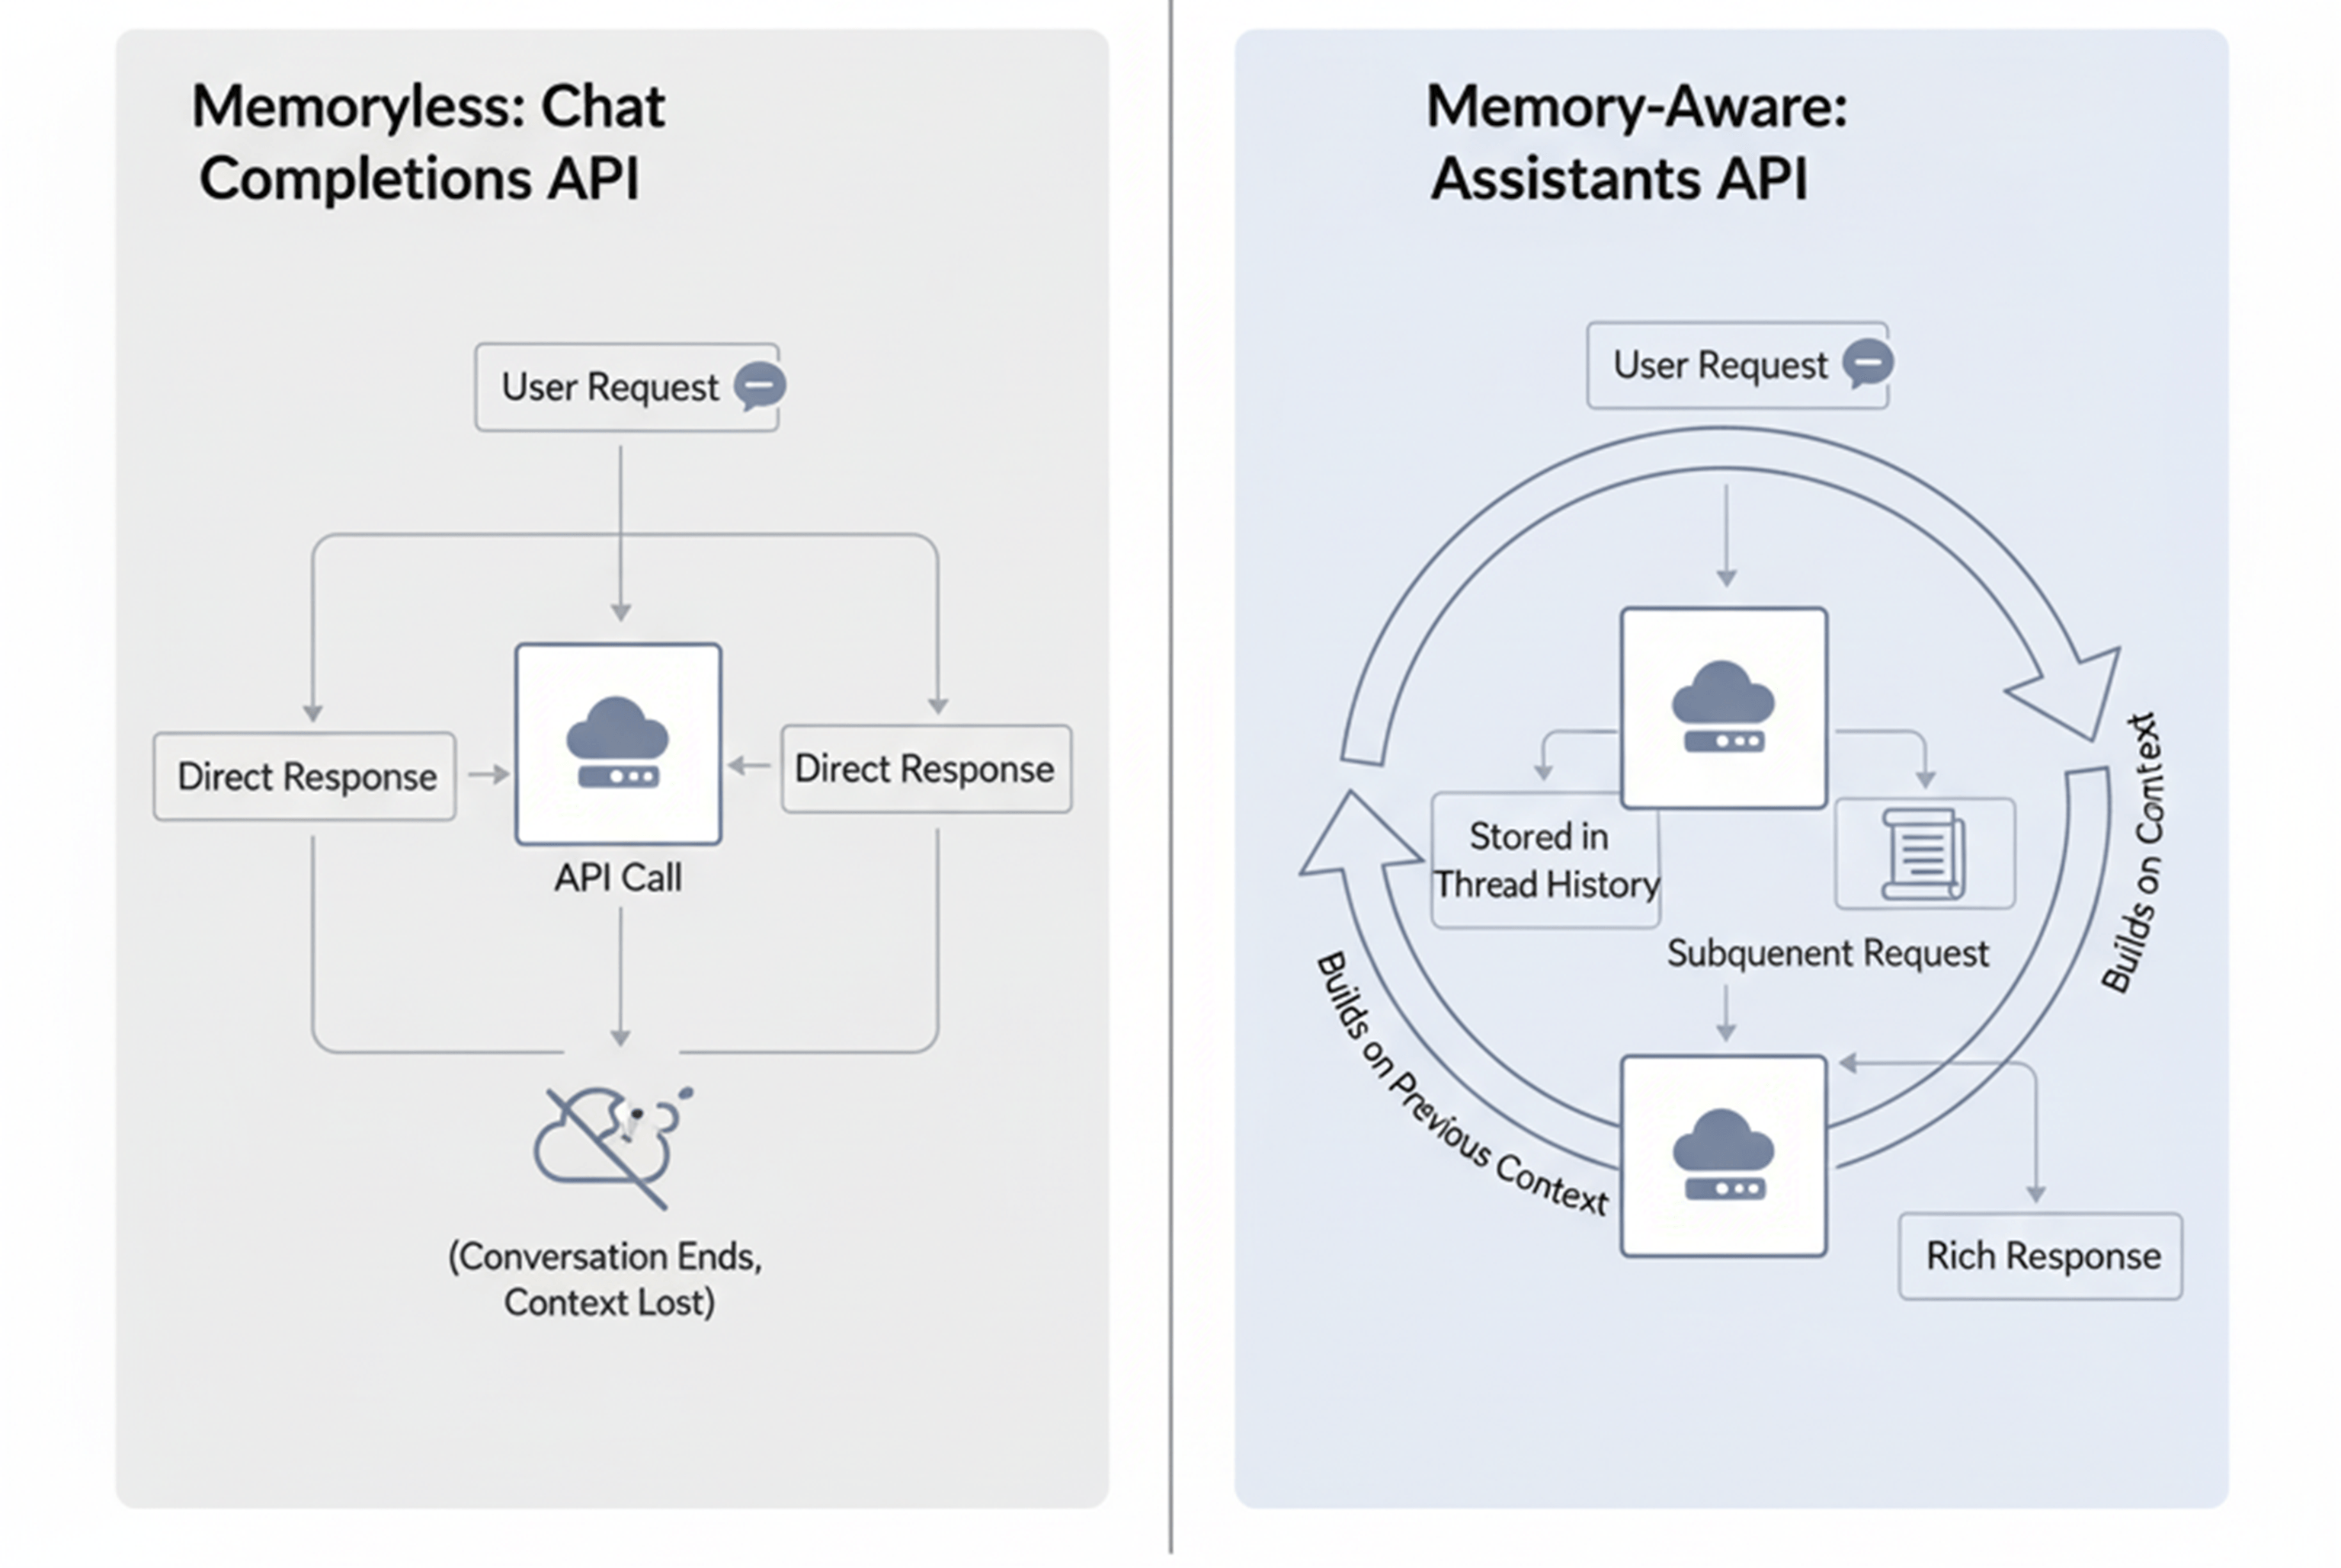
Chat Completions vs Assistants API
Feature | Chat Completions (Part 2) | Assistants API (Part 3) |
|---|---|---|
Memory | ❌ None (stateless) | ✅ Persistent across sessions |
Setup Complexity | Low (simple) | Moderate (threads required) |
Cost | Lower per request | Higher (storage + compute) |
Built-in Tools | ❌ Manual integration | ✅ Code interpreter, file search |
Use Case | Single-turn tasks | Multi-session workflows |
Best For | Quick automation, chatbots | Customer support, analysis |
Step 1: Create Your First Assistant
Create assistant.js:
javascript
// assistant.jsimport 'dotenv/config';import OpenAI from 'openai';const openai = new OpenAI({ apiKey: process.env.OPENAI_API_KEY });
/**
* Creates a new OpenAI Assistant with specified tools and capabilities */export async function createAssistant(options = {}) { const { name = 'Business Assistant', instructions = 'You are a helpful business assistant. You can analyze data, search files, and help with calculations. Always provide clear, actionable insights.', tools = [ { type: 'code_interpreter' }, // Run Python code { type: 'file_search' } // Search uploaded files ], model = 'gpt-4.1' // Use full GPT-4.1 for assistant features } = options; console.log('🔧 Creating assistant...'); const assistant = await openai.beta.assistants.create({ name, instructions, tools, model, temperature: 0.7 }); console.log('✅ Assistant created:', assistant.id); return assistant;}
/**
* Lists all your existing assistants */export async function listAssistants() { const assistants = await openai.beta.assistants.list({ limit: 20, order: 'desc' }); return assistants.data;}
/**
* Retrieves a specific assistant by ID */export async function getAssistant(assistantId) { return await openai.beta.assistants.retrieve(assistantId);}
/**
* Deletes an assistant (cleanup) */export async function deleteAssistant(assistantId) { console.log(`🗑️ Deleting assistant: ${assistantId}`); await openai.beta.assistants.del(assistantId); console.log('✅ Assistant deleted');}
What's happening here?
Code Interpreter tool:
- Runs Python code in a sandboxed environment
- Perfect for data analysis
Advanced Capabilities - The Code Interpreter Tool
The code interpreter tool (opens in new tab) is a game changer for AI agents, enabling them to perform complex data analysis, manipulate spreadsheets, generate visualizations, and execute custom computations seamlessly, all within a secure environment. This lets developers and teams automate complex workflows and uncover insights - no manual coding required.
As AI agents continue to evolve, combining natural language understanding with powerful code execution and multi-tool orchestration, the possibilities for autonomous decision-making and intelligent automation expand exponentially. Whether you’re building assistants for research, customer support, content creation, or business automation, leveraging these advanced tools ensures your solutions remain adaptable, scalable, and ready for the complexities of real-world applications.
Conclusion - The Future of AI Agents in Node.js
Now you know how to build AI agents with OpenAI - from connecting APIs to giving them memory and autonomy.
Learning how to build AI agents with OpenAI’s SDK and persistent memory features is changing how software gets built in 2025. These AI agents don’t just respond - they reason, integrate with external systems, and autonomously perform complex tasks. Whether your goal is research automation, customer support, or advanced business workflows, these tools empower you to create scalable, intelligent solutions.
Curious how AI can speed up business analytics and data processing? Check out our project Agentic AI Business Intelligence (opens in new tab)
With the Node.js OpenAI SDK, you have a powerful and flexible platform to build robust AI agents quickly and efficiently. As you’ve seen throughout this tutorial, combining API integrations, error handling, cost optimization (opens in new tab), and multi-step reasoning unlocks new possibilities for AI automation.
Ready to harness the full power of AI agents? Start building your own AI automation with OpenAI APIs today and unlock new possibilities for your Node.js applications.
Start your project today, experiment with function calling and memory, and see how fast you can build AI agents that truly work for you.
Now that you’ve learned how to build AI agents with OpenAI in Node.js, here are answers to the most common developer questions.
FAQ
How do I secure my OpenAI API keys?
Securing your OpenAI API keys is critical to preventing unauthorized access and unexpected charges. Best practices include:
- Store API keys securely (opens in new tab) using environment variables or dedicated secrets managers like AWS Secrets Manager or Azure Key Vault. Never hardcode keys in your source code or expose them in client-side apps.
- Add
.envfiles to.gitignoreto avoid pushing secrets to public repositories. - Limit API key permissions by granting only necessary scopes and implementing role-based access controls.
- Rotate keys regularly to reduce risk from compromised credentials. Automate this process if possible.
- Use secure transport protocols (TLS/HTTPS) to protect keys in transit.
- Monitor usage and set usage limits to detect anomalies or abuse early.
Following these measures forms a multi-layered defense that keeps your API access safe while enabling seamless development and deployment.
Difference Between Chat Completions and Function-Calling AI Agents
- Chat Completions API provides straightforward, single-turn conversations where the model replies based on the prompt without external tool access or memory. It’s simpler, faster, and ideal for FAQs, content generation, or basic chatbot tasks.
- AI Agents with Function Calling are more advanced. They can:
- Detect when external tools or APIs are needed and call them during the conversation.
- Perform multi-step reasoning and workflows.
- Maintain conversational context across interactions when combined with persistent memory features.
- Handle complex tasks like data analysis, web search, and dynamic decision-making autonomously.
Function calling AI agents enable richer, scalable, and more intelligent applications beyond simple text exchange.
How can I optimize costs when using OpenAI APIs?
To manage and reduce OpenAI API usage costs:
- Choose cost-effective models (e.g., GPT-4.1-mini) for development and less critical tasks.
- Limit token usage by setting appropriate
max_tokensand truncating prompts. - Batch requests or combine tasks to minimize calls.
- Monitor usage regularly through dashboards or APIs to detect spikes early.
- Implement caching for repeated queries or static data.
- Use function calling selectively to avoid unnecessary tool executions.
- Set budgets and alerting so your team can react proactively.
Smart usage patterns ensure you benefit from powerful AI functionality without overspending.
Can I use persistent memory between sessions with OpenAI agents?
Yes, persistent memory is supported through the OpenAI Assistants API which:
- Enables storing conversation threads and context across sessions.
- Maintains stateful workflows that remember user preferences and past interactions.
- Allows AI agents to build on previous data, making them more useful for long-term, complex tasks.
Without persistent memory, each interaction is stateless, limiting functionality to single-turn or reactive agents. Using persistent memory transforms agents into true digital teammates capable of ongoing assistance and context-aware decision-making.
What about GPT-5?
GPT-5 represents OpenAI’s latest generation model, available to select customers and developers with advanced requirements. It offers improvements in reasoning, creativity, and multimodal understanding but at a higher computational cost. The GPT-4.1 series, including GPT-4.1-mini, remains widely used for reliable, cost-efficient AI agent building in 2025.
Ready to build your own AI agent?
At MYGOM, we help companies create real, production-ready OpenAI solutions - from simple chat agents to advanced systems that can think and act autonomously.
Get in touch with our team (opens in new tab) and let’s turn your idea into a working AI product.

Justas Česnauskas
CEO | Founder
Builder of things that (almost) think for themselves
Connect on LinkedIn